
Night Photography - How To Start
We all know that photography needs lots of practice. But there is a dilemma for people who have a full-time job. In the summer, even you are lucky to finish at 5pm, you are only left with a couple of hours before sunset. When it comes to winter, by the time you finish work it's probably already dark. To many photo enthusiasts, weekends and vacation are the only option. So how do we maximize our learning given the limited time we have? Here comes the answer of night photography and long exposure (unless you are completely happy with the blurry images with high pixel noise you take in the darkness).
[Note: I was just giving general example, sunrise/sunset hours change depending on your location. You'll obviously be very lucky in Norway (or other countries close to North Pole) during the summer when the days are super long but unlucky in the winter there]
1. Get yourself prepared for the right equipment
First and foremost, you need a tripod. Price for a tripod ranges from $20 to $1000. Here's my suggestion of choosing a right tripod. Please also understand that some tripods (particularly professional high quality ones) do not come with a ballhead so make sure to check if you get everything you need. Tripod makes a huge difference in your photography experience. It allows you to produce higher quality landscape images even with a so so lens. It also gives you the option to practice even after work on weekdays if you want to - so you can take better pictures when you go on a vacation.
Second (but optional), you need to get a remote shutter release. It's very common to shoot night photography in an exposure longer than 30 seconds, and many cameras typically allow up to 30 seconds exposure. A remote shutter release is a must if you want to expose over 30 seconds. Of course at the beginning, you don't need to get this and can still practice night photography (within 30 seconds exposure).
Fortunately, you don't need a "fast lens" which could cost twice as much as a lens with similar zoom range.
[Note: A lens with a larger maximum aperture is called a "fast lens" because it achieves the same exposure with a faster shutter speed. I often advise beginners - if you are interested in photographing people, wild animals or sports, by all means get a fast lens. But if you like to photograph landscape, by all means get a tripod and save the money for a fast and expensive lens later]
2. Choose the subjects that interest you
There are many subjects you can photograph at night. Good news is that oftentimes the long exposure photograph produced at night looks nicer than the subject you see from your own eyes. For example:
Well-lit landmarks
Golden Gate Bridge, San Francisco, CA. ISO320, 16mm, f/10, 30sec

Golden Gate Bridge-002
Long light trails of moving vehicles
Deadwood, SD. ISO100, 16mm, f/20, 20secLincoln, NE. ISO100, 24mm, f/22, 30sec

Day 45 - Deadwood SD-002
Lincoln, NE. ISO100, 24mm, f/22, 30sec
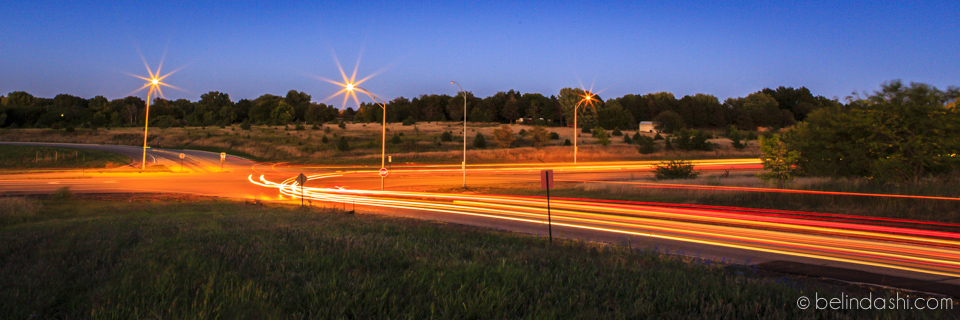
Day 60 - Lincoln Nebraska-008
Fireworks
July 4th fireworks in 2013, San Francisco, CA. ISO100, 140mm, f/8, 0.5sec

2013 July 4th fireworks-100
Star trail or milky way if you live or travel in the country side

Day 50 - Milky Way From Pinnacles Overlook-001
I'm so envious of my Canadian host during my trip to Alberta. The milky way was so clear and hung right in front of my eyes when I stayed at their 1000 acre ranch.
The following milky way was photographed at Pinnacles Overlook, Badland National Park, SD, ISO12800, 16mm, f/2.8, 15sec.
Landscape in twilight (after sunset)
Theoretically it's not night time yet, but you can use the same equipment and technique to do long exposure.
Lake Tahoe, NV. ISO100, 29mm, f/22, 60sec

Day 69 - Lake Tahoe in sunset-003
3. How to…
1st P - Planning
Pick a subject above that most interests you and easily accessible to you
If you are new to night photography, make sure to practice on how to use tripod, ball head and remote shutter release before heading out. It would be more challenging to fumble around in the darkness if you are not familiar with operating your equipment
Wear comfortable shoes and warm cloths (if it's windy/cold)
If you use iPhone, install an app called Flashlight, you might need it (in case you don't bring a flashlight)
Checklist to bring (even professional photographers forget things so make sure have a checklist and actually check it)
must: camera, lens, tripod
optional: shutter release, a flashlight
2nd P - Photo taking
As you can see from the above photos, there's no set rule for the camera setting. I would suggest the following:
set the ISO as low as you can, except for stars and milky ways, which is the opposite
set the aperture to f/8 or above for landscape. This is not rule of thumb and should change depending on the distance of the majority of subjects in your frame. For example for stars and milky ways, you should use the smallest f stop / largest aperture
focus on the light or the border of light/darkness. If your camera has a hard time focusing, switch from auto focus to manual focus. It’s much easier to achieve precise focus by using single point focus, no matter you use auto or manual focus.
take test shot and check histogram on your camera (if you have it). If the picture is under-exposed (histogram curve tilted toward left), increase your exposure time (slow down your shutter speed). If the picture is over-exposed, decrease your exposure time (increase shutter speed).
use manual or bulb mode so you can tell the camera what aperture and shutter speed to use. Bulb mode is a must if you want to execute a longer than 30 second exposure
if increasing exposure time still produces under-exposure, increase ISO, or increase exposure compensation, or do both. I would try to control the ISO to under 800 (depending on the camera you use) because higher ISO will produce more digital noise for your image, which is something you want to avoid
adjust and change the above steps until you get the right exposure (histogram is the best indicator)
try different composition. Don't be afraid to move around. Sometimes the best shot is just a few feet away or higher.
3rd P - Post Processing
How you'd like to retouch your photos and how much time you want to put into it is purely based on personal choice. However, if you have never explored photo retouching in the digital photography world, you are missing a big creative part of the total photography experience. That doesn't mean you have to spend hours retouching every single photo you take. In fact, quite the opposite, if you learn to first take the right photo - meaning with the right composition, exposure, your photo editing effort could be minimal. As I have introduced earlier, on average I spent 5-10 seconds to retouch my landscape and travel photos. Photo retouching to me is an extension of the creative process, bringing what the camera can't accomplish to what I want my audience to see, and feel. I have recorded several videos explaining my Adobe Lightroom post processing workflow. You can certainly develop your own over time and form your own style.
you may also love…


After 3 nights in Tromso, 3 nights in Senja and 6 nights in Lofoten, we wrapped up our road trip and flew out of the Arctic Circle. Our final stop for this Norway trip was Bergen, the country’s second largest city, and one of North Europe’s oldest ports.