
Top 5 custom buttons to speed up your photography workflow on Sony A7III
If I say customizing menu settings and custom buttons on Sony A7III is the deepest learning curve on my photography journey, it’s not overrated!
In my past Canon experience, any changes were made pretty easily. There is a function screen on the top of the camera, which Sony A7III doesn’t have.
Other than aperture, shutter speed, exposure compensation, which have their own dials, you have to go into the menu to change settings on Sony A7III.
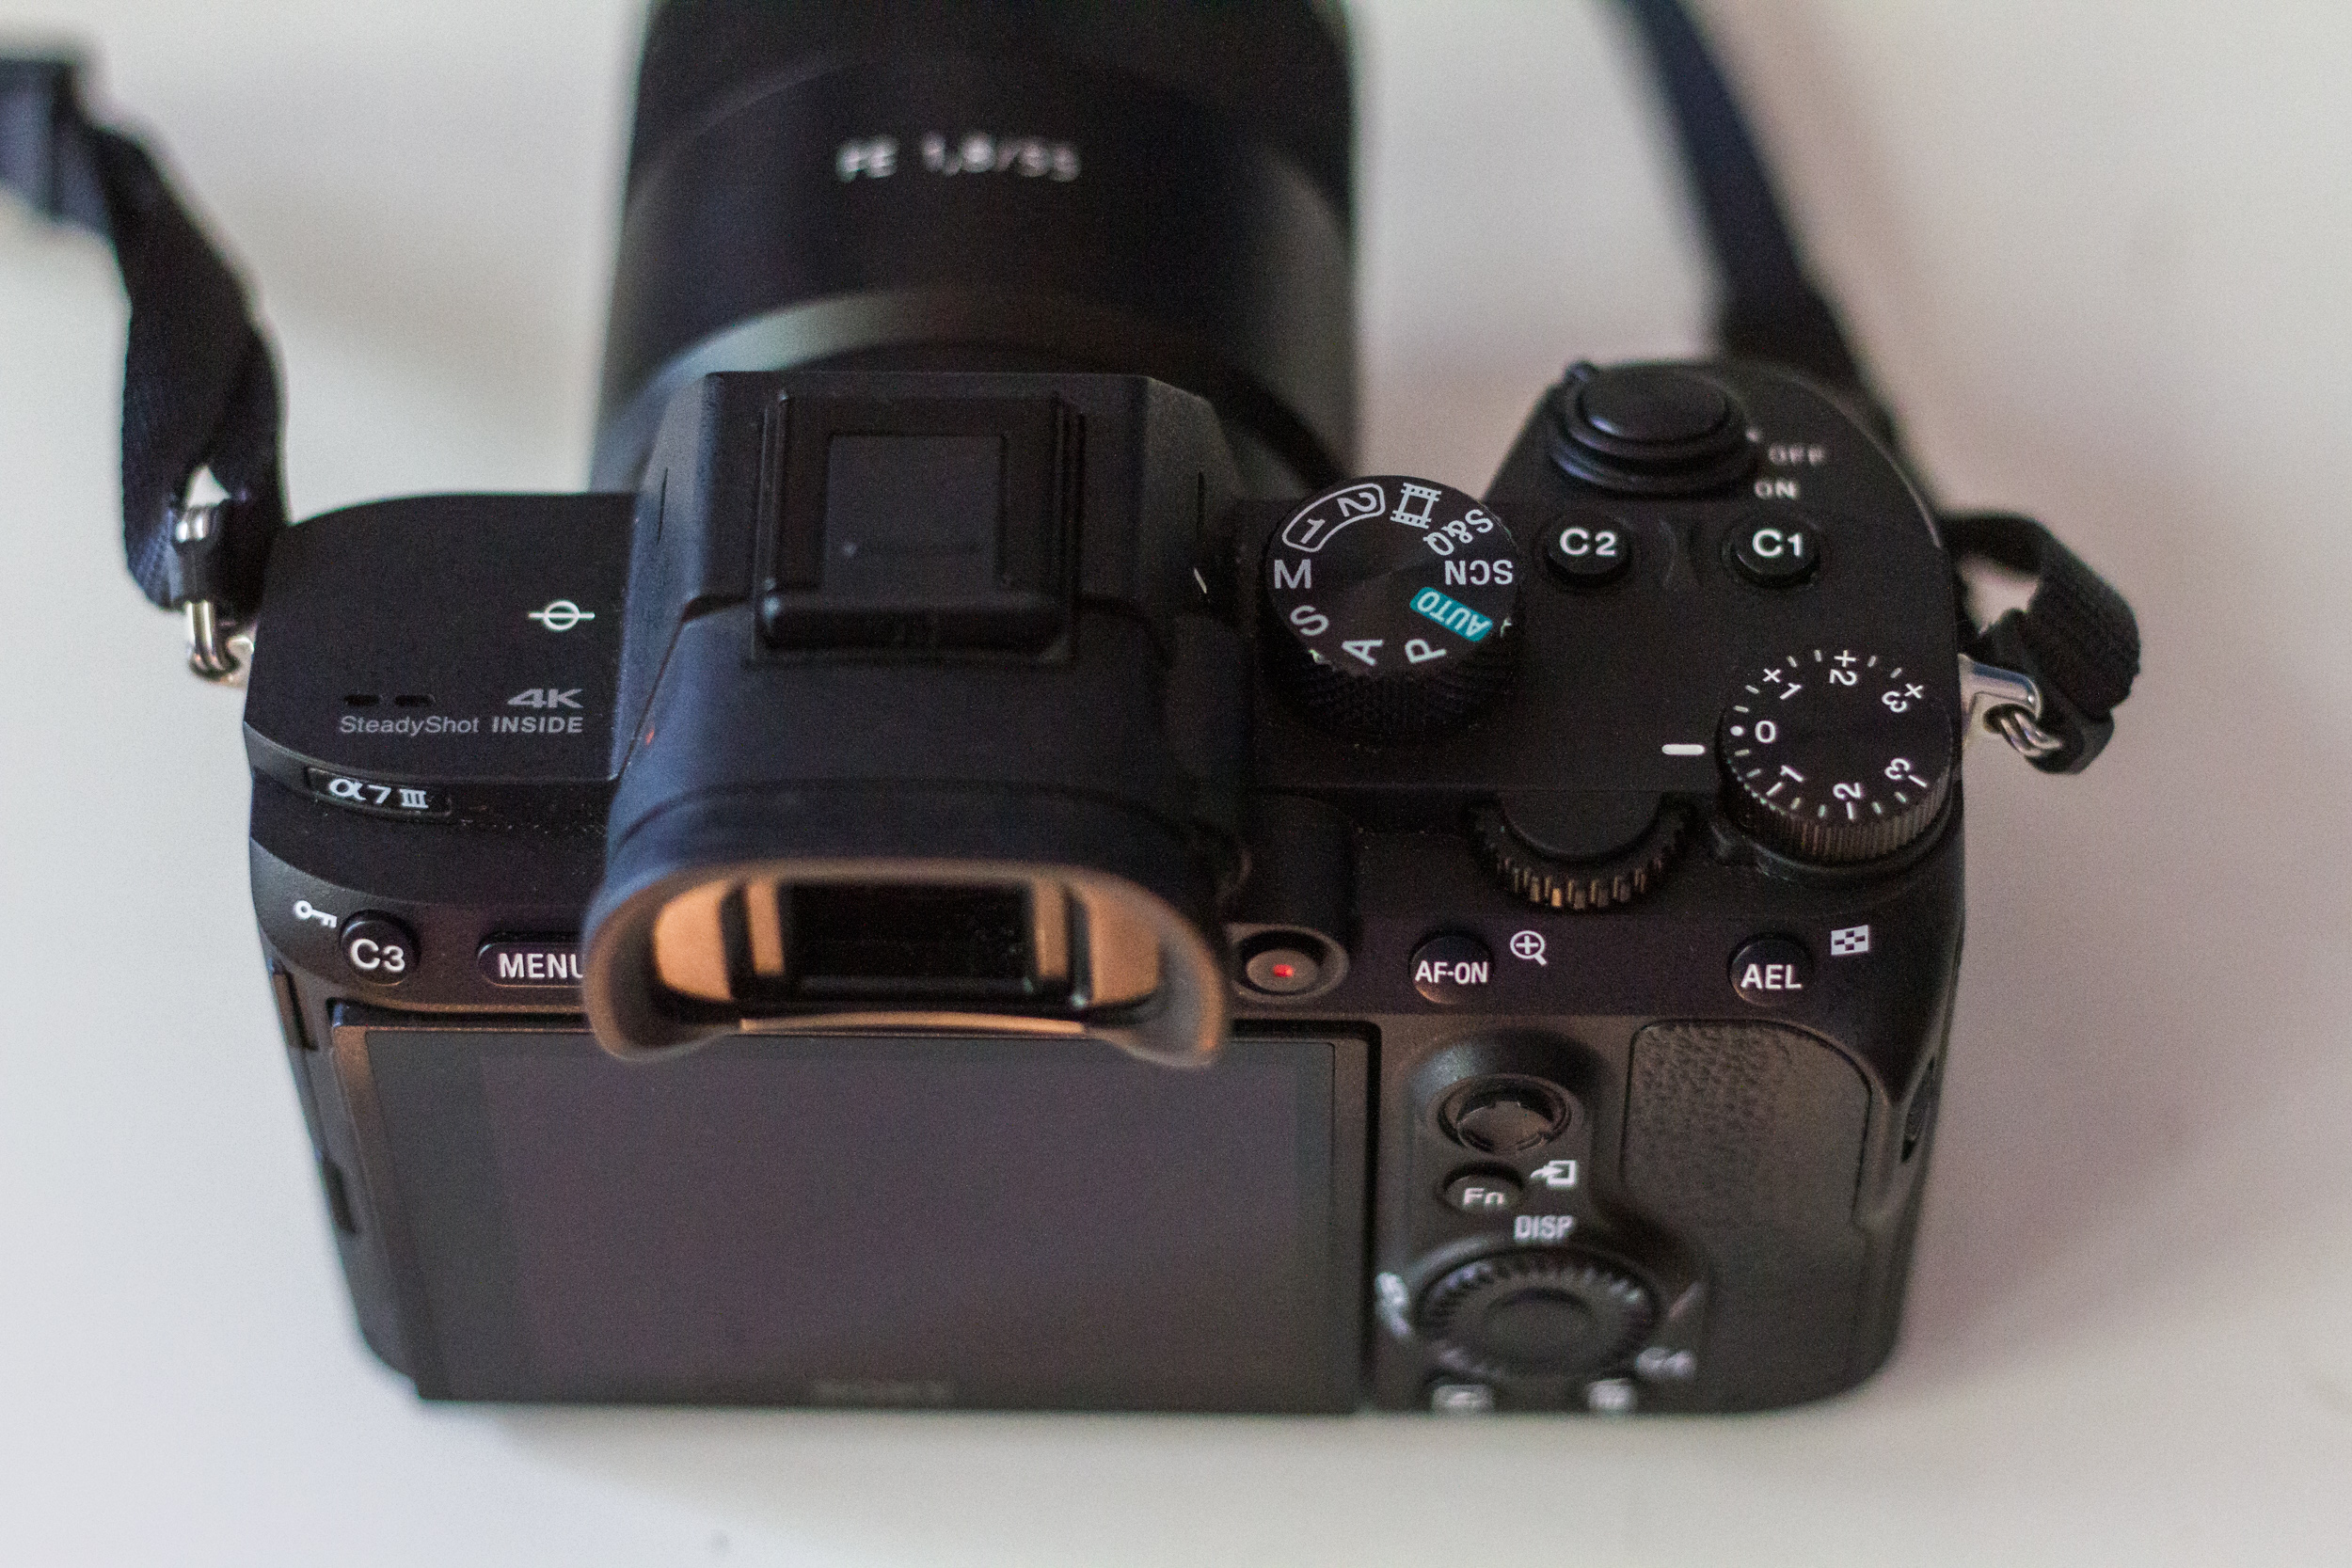
But there’s a problem. Sony A7III has a menu system of 37 pages. Every time you try to change settings, you easily get lost in this complicated menu.
After using the camera for almost a year (since 2018), and gradually getting familiar with my own habits, I have decided to customize my settings in the following priority:
1 - Custom buttons
My top priority settings, used for the most frequently changed settings, or settings that require quickest access. Each custom button can be used differently in photo or video mode. If you need to access similar functions for both photo and video, eg. ISO, try to use the same custom button. It minimizes confusion and will help you speed up your workflow.
2 - Quick menu
My 2nd priority settings, used for settings I change occasionally. Also I try to put certain settings jointly used for photo and video in this menu. (See below)

Want a new camera but don’t know how to choose? Check out my free video guide that will help you understand the key criteria to choose the right camera, and save time to narrow down choices.
Mirrorless Camera Ultimate Buying Guide (2023 version)
〰️
Mirrorless Camera Ultimate Buying Guide (2023 version) 〰️
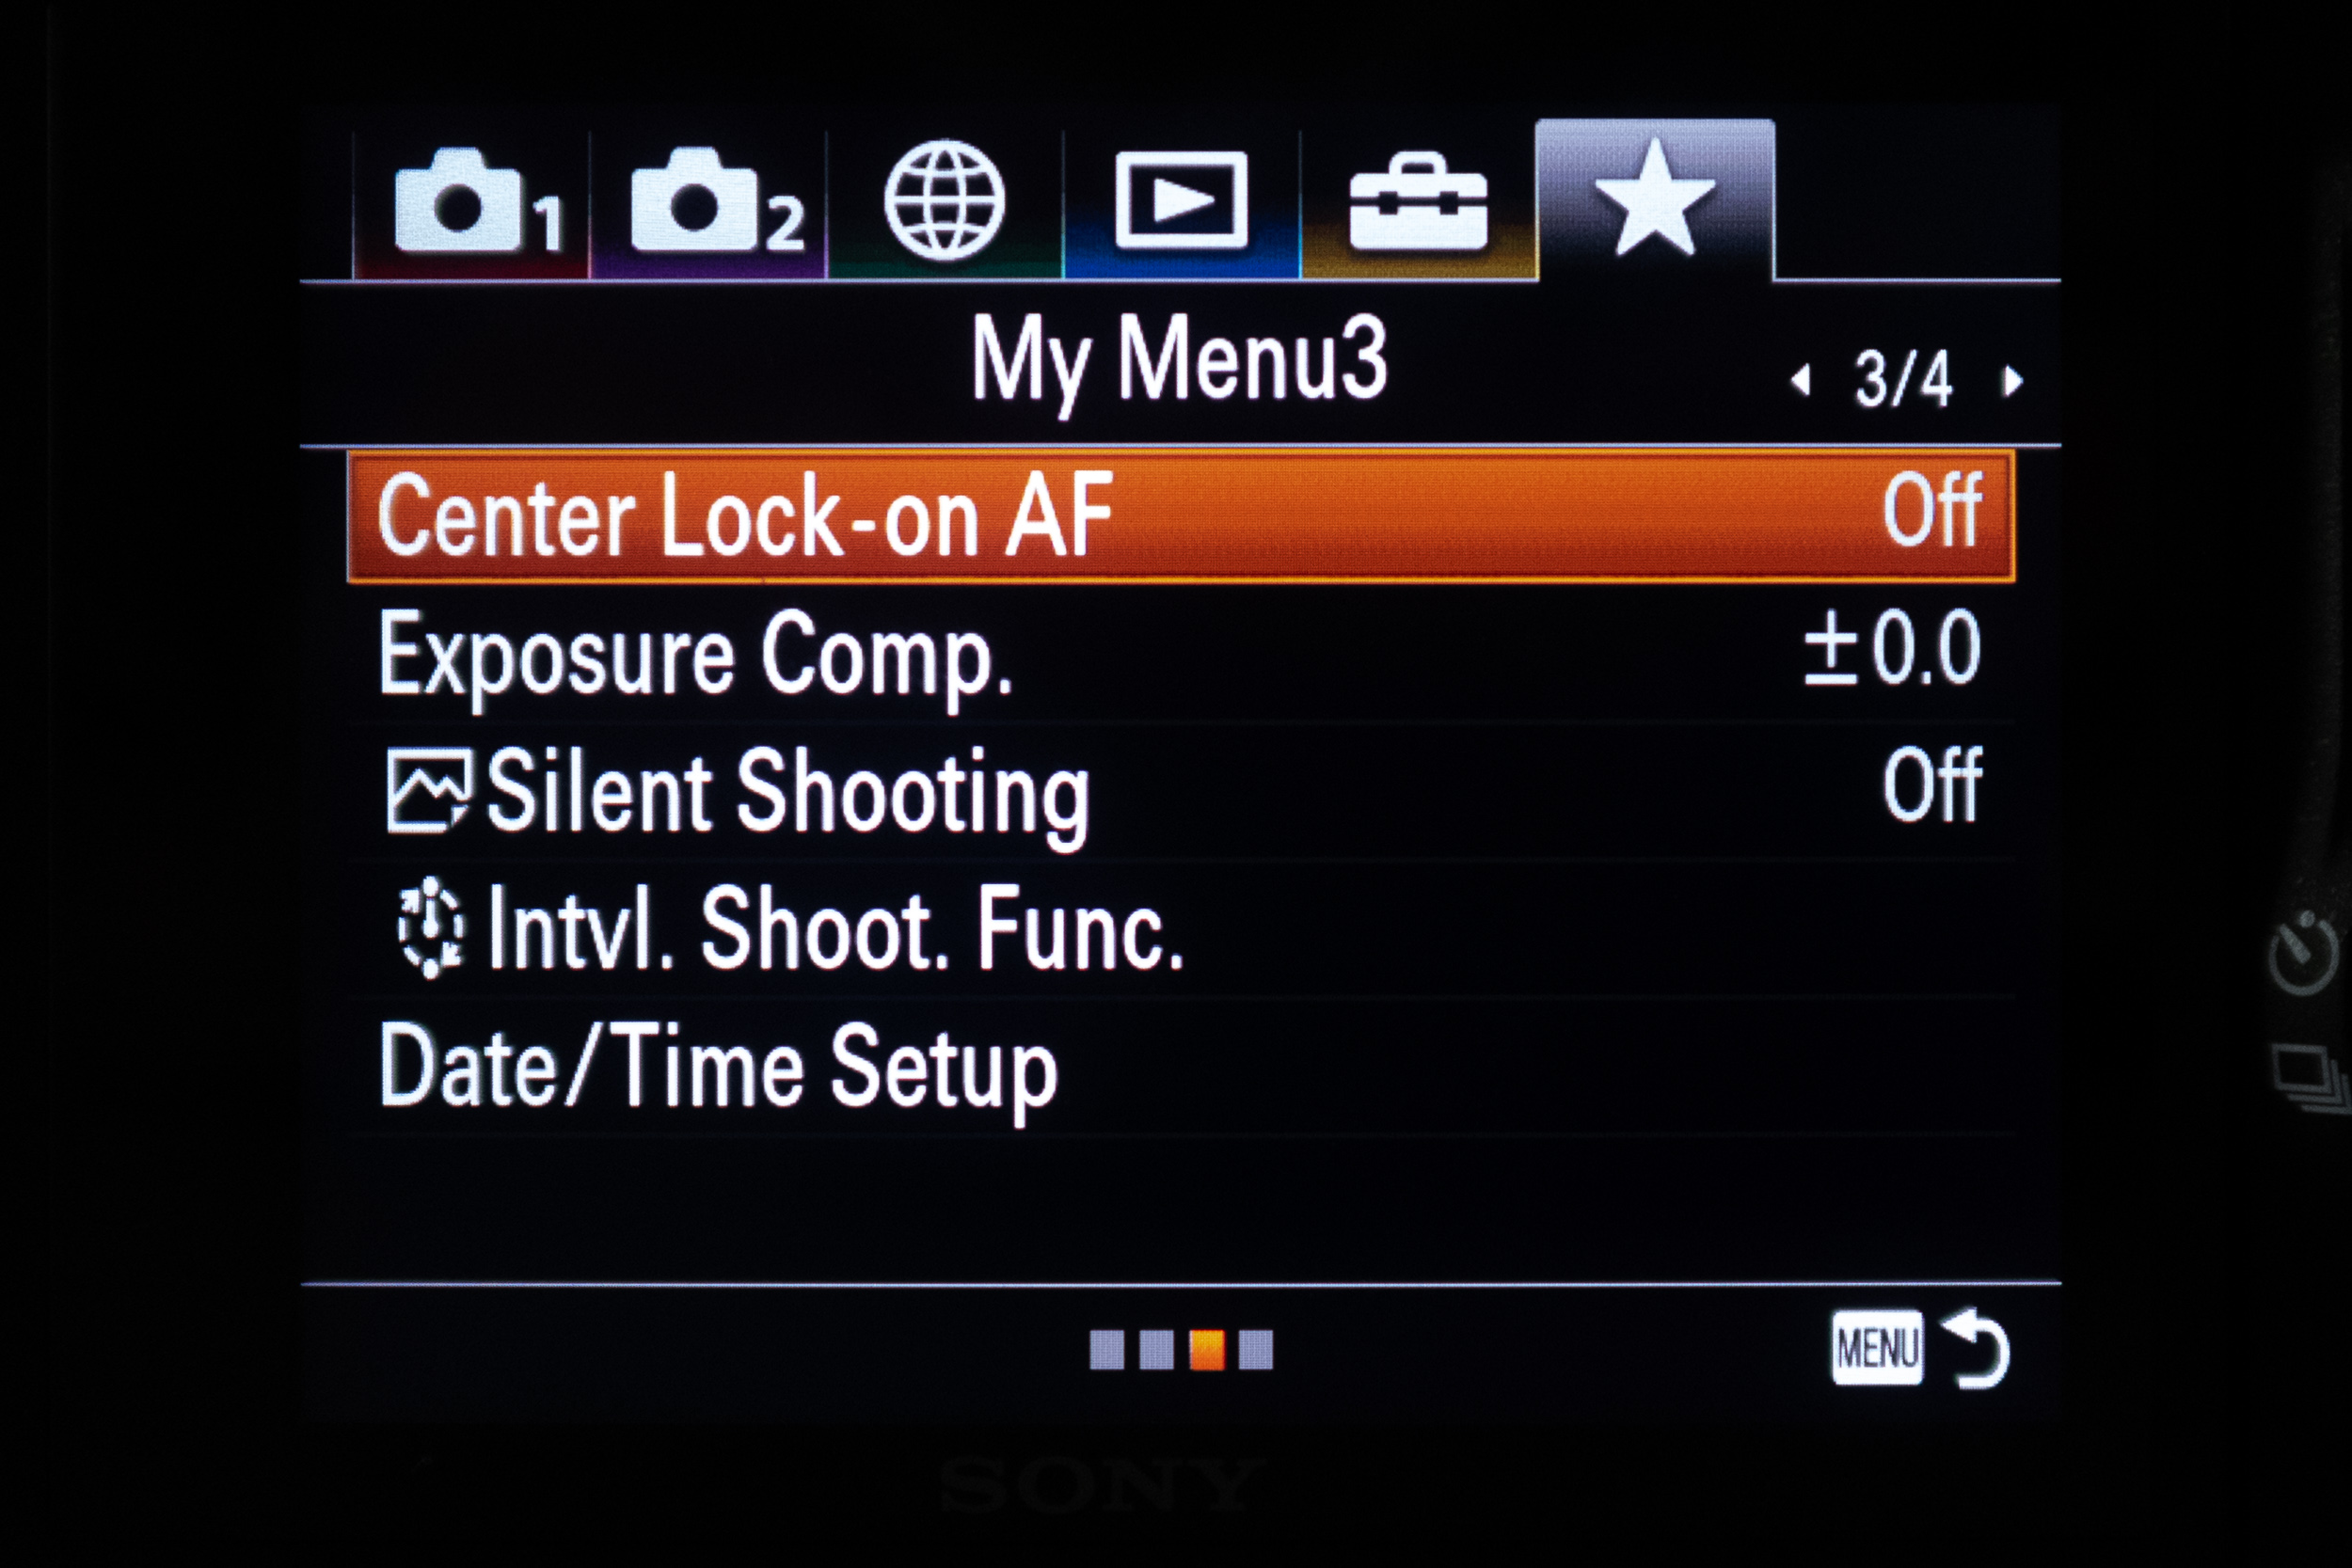
3 - My menu
The last tab in the camera menu (see below). As the quick menu only allows 12 items, and my menu doesn’t have limit. I simply put more items here. The quick menu and my menu are not mutually exclusive. In fact my menu is more inclusive of most settings in my custom buttons and quick menu, but it’s still a small sub-set of the 37-page full menu, allowing me to quickly find what I want.


My Top 5 Settings
In addition to the revolutionary eye AF (in separate post here), here are the top 5 settings I use or change most often for photography (video custom setting is different and will be explained in a separate post):
1 - Focus Area
There are many selections. I use “wide” in conjunction with eye AF most of the time as I generally use the camera to photograph people.
When I don’t use eye AF, I mostly use flexible point or expand flexible point. They are similar to the single focus point I was used to for a long time.
In order to adjust the focus point fast, I generally use the touch screen, and tap the screen to set the focus point. (Again, eye AF is a different story. No screen touch is necessary. Instead, you can easily activate it by pressing a custom button.)
With my previous DSLR cameras, I always used viewfinders. Shooting photos with LCD screen and holding the camera away from my face, like holding a smart phone, took me some time to adjust. Now I kind of enjoy taking photos that way. I get less stare than when I used my large Canon 5D Mark III.
2 - Focus mode
When I shoot a still object, not using eye AF, I switch focus mode from AF-C (continuous auto focus) to AF-S (single auto-focus).

3 - Drive mode
Most of the time, when I photograph kids, I choose continuous shooting – Low or Mid. This typically generates 3-6 frames per second. When I was extra careful clicking the shutter with light tap, I could get only one image at a time to avoid repeating the same shots. I probably only used Hi or Hi+ during the first week testing the camera with super excitement. Even kids move all the time, they don’t move like race cars, so Hi or Hi+ would be overkill.
I will most likely use “single shooting” which achieves one image per shutter click when I do landscape work.

4 - ISO
I shoot in full manual mode most of time. Aperture and shutter have their own dials, and are what I change first. ISO is usually what I change last.
In fact when I used Canon 5D Mark III, I left ISO on 100 most of the time for landscape, and Auto for people. I still use Auto ISO on Sony A7III, and set the minimum 100 and maximum 25600, so I can prevent the camera to automatically set an ISO too high.
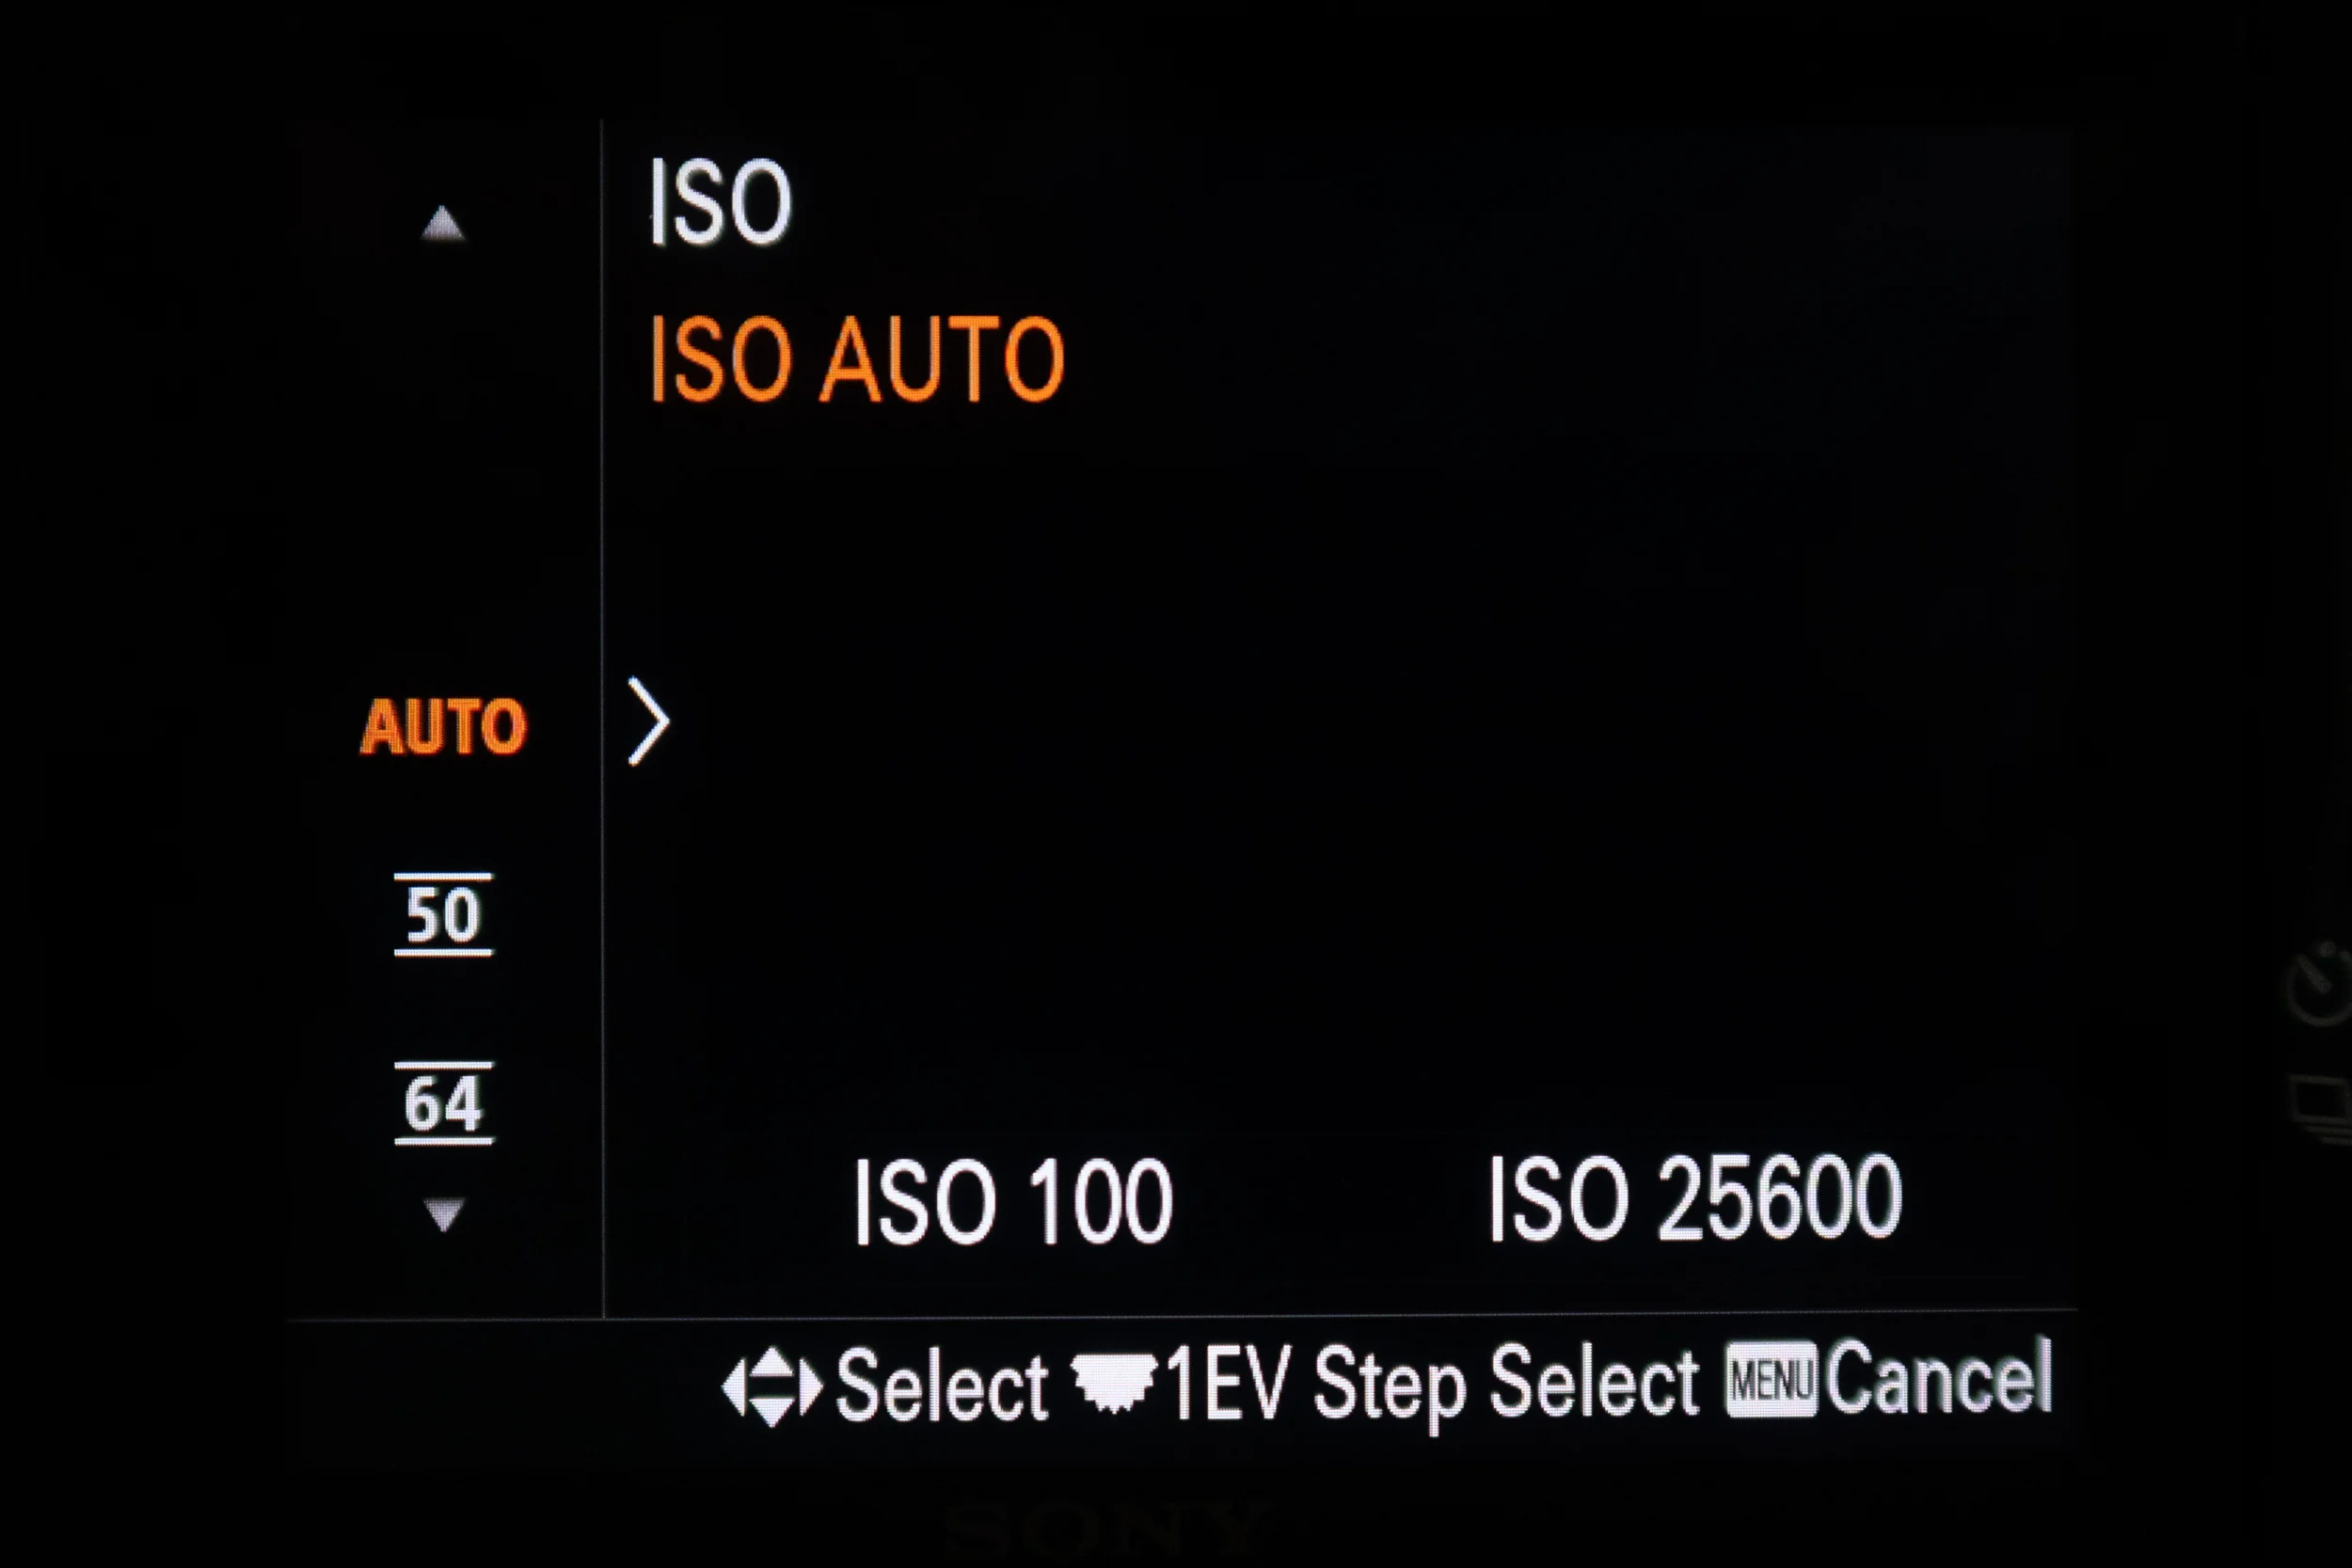
Of course, if I don’t want the ISO to go beyond certain point (within the ISO100-25600 range), I’d take if off Auto and manually adjust it, and adjust aperture and shutter according. However, this usually leads to under-exposed image if the shutter speed is set too fast, or blurry action if the shutter speed is too slow. Neither is what I wanted. I’d rather fix the high noise by exposing the image correctly with the correct shutter on a high ISO generated automatically by the camera.
Caveat: if you are someone who has never post processed your image, I’d set the maximum ISO even at lower point. Without noise reduction in post processing software, you might generate too much noise in your image if you take your shots in low light condition with an ISO in 5 digit.
5 - APS-C S35/Full Frame selection
I have so far only purchased one Sony native lens - Sony 55mm F1.8 Sonnar prime lens. (More details about how I downsized to one camera one lens)

Full frame without APS-C S35
A custom button allows me to turn my 55mm focal length into 88mm (1.6 factor). What a marvelous setting! That means I will never need a 85mm prime lens.

Full frame with APS-C S35
How To Set Up Custom Buttons
Since the above-mentioned 5 settings are my most frequently changed settings, I have assigned each of them to a custom button.
On menu tab 2, page 8, click the top “custom key” to set custom buttons for photography.

Here’s my set up:


Custom button 1 – focus mode
Custom button 2 – drive mode
Custom button 3 – eye AF
(separate post later for more details)
Multi-select (Joystick) center button – APS-C S35/Full Frame selection
Center button (inside the control wheel) – Focus Settings.
It’s essentially changing the focus area. I like Focus Settings better as it allows me to scroll across all options, including its sub-options, horizontally. It’s easier for me to make a selection and change settings.

Focus settings custom button interface
Focus Area, however, requires you to vertically scroll down main options (eg. Flexible spot) and then click left/right to go into its sub option (eg. Flexible spot Large, Medium or Small).

Other than the above, I have also assigned a few additional custom buttons:
Left Button – Silent Shooting (use with Caution)
If I burst images in public, sometimes I like to shoot silent so as not to bother others. However, there’s a big problem when shooting silent indoors – there is significant banding across the whole image, something to do with the frequency of light used indoors (see sample photos below). So I have to be extremely careful using this function. I left the custom button there but only use it when I am not dealing with fluorescent or tungsten lights.


Right Button – ISO
This is the default setting. Even it’s not the easiest way to change ISO, it has a clear ISO mark on the camera body for this button. So I keep it as is.
Down Button and Custom Button 4 are located close to the bottom at the back of the camera. I don’t find it easy to press them, and thus choose not to set any custom functions to these buttons.

AEL Button – AEL hold
Just its default function. It allows you to hold the exposure while changing the composition. I know many photographers customize this button for something else. But I think holding AEL can quickly help you get an ideal exposure.
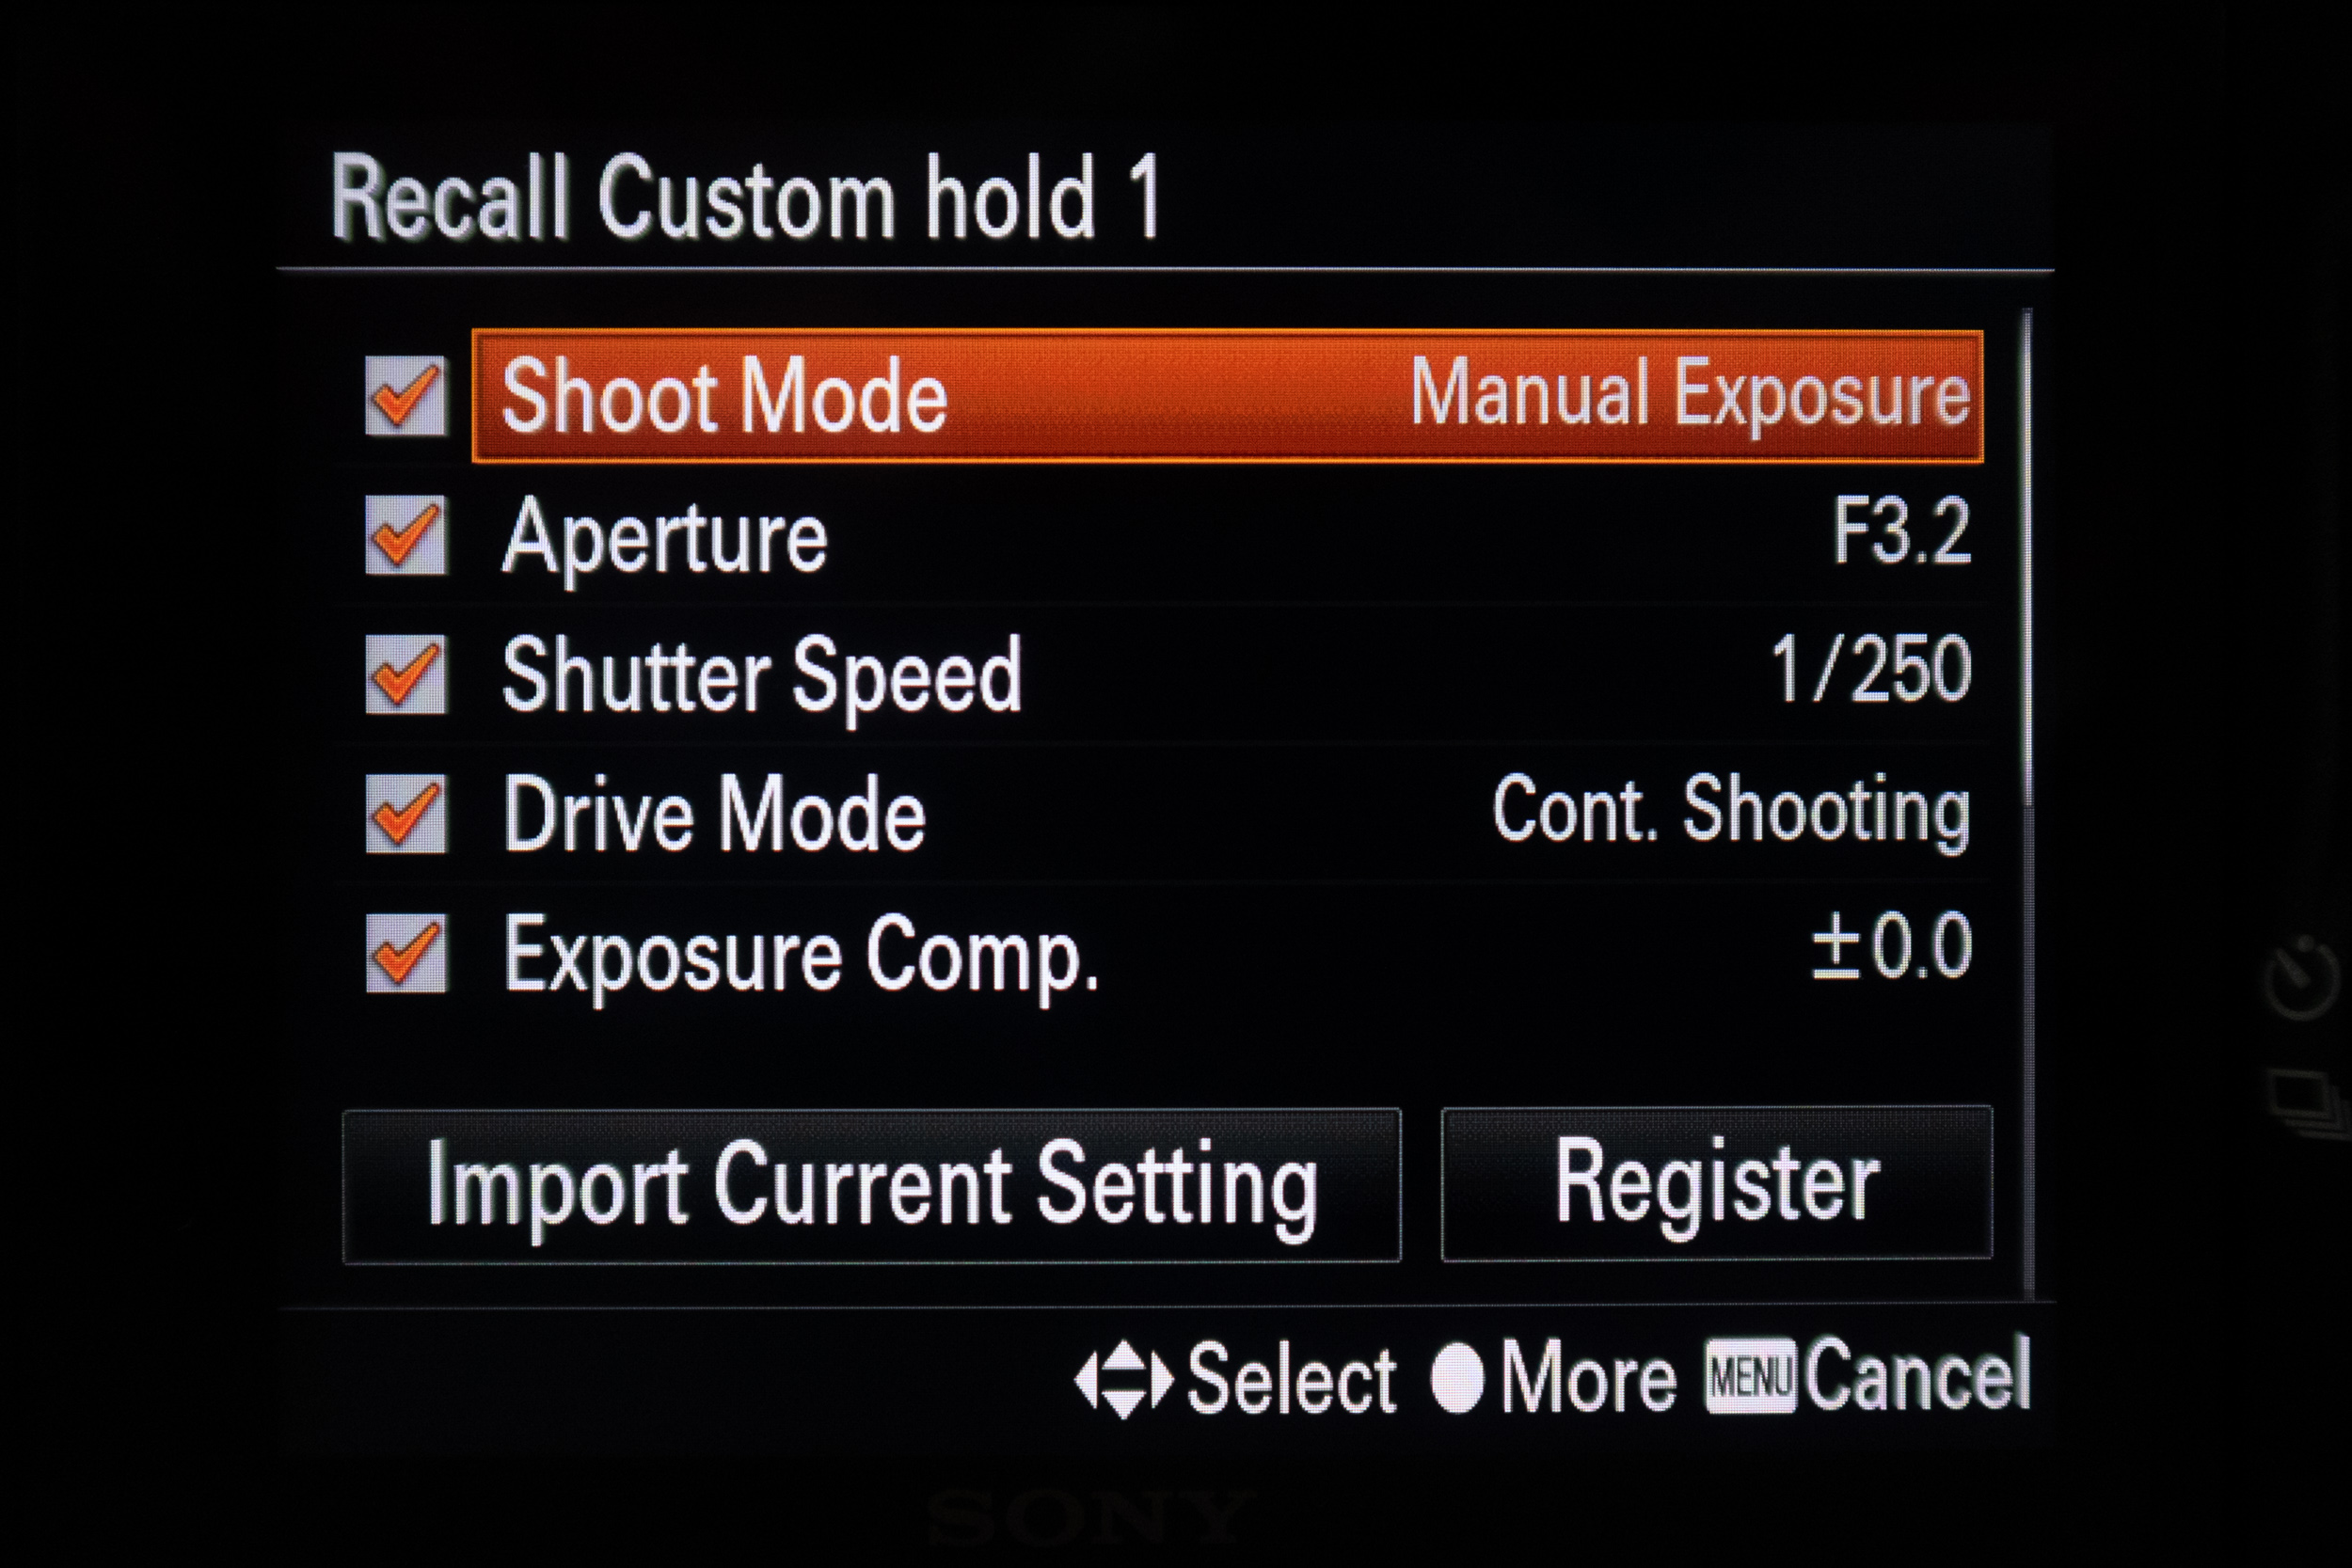
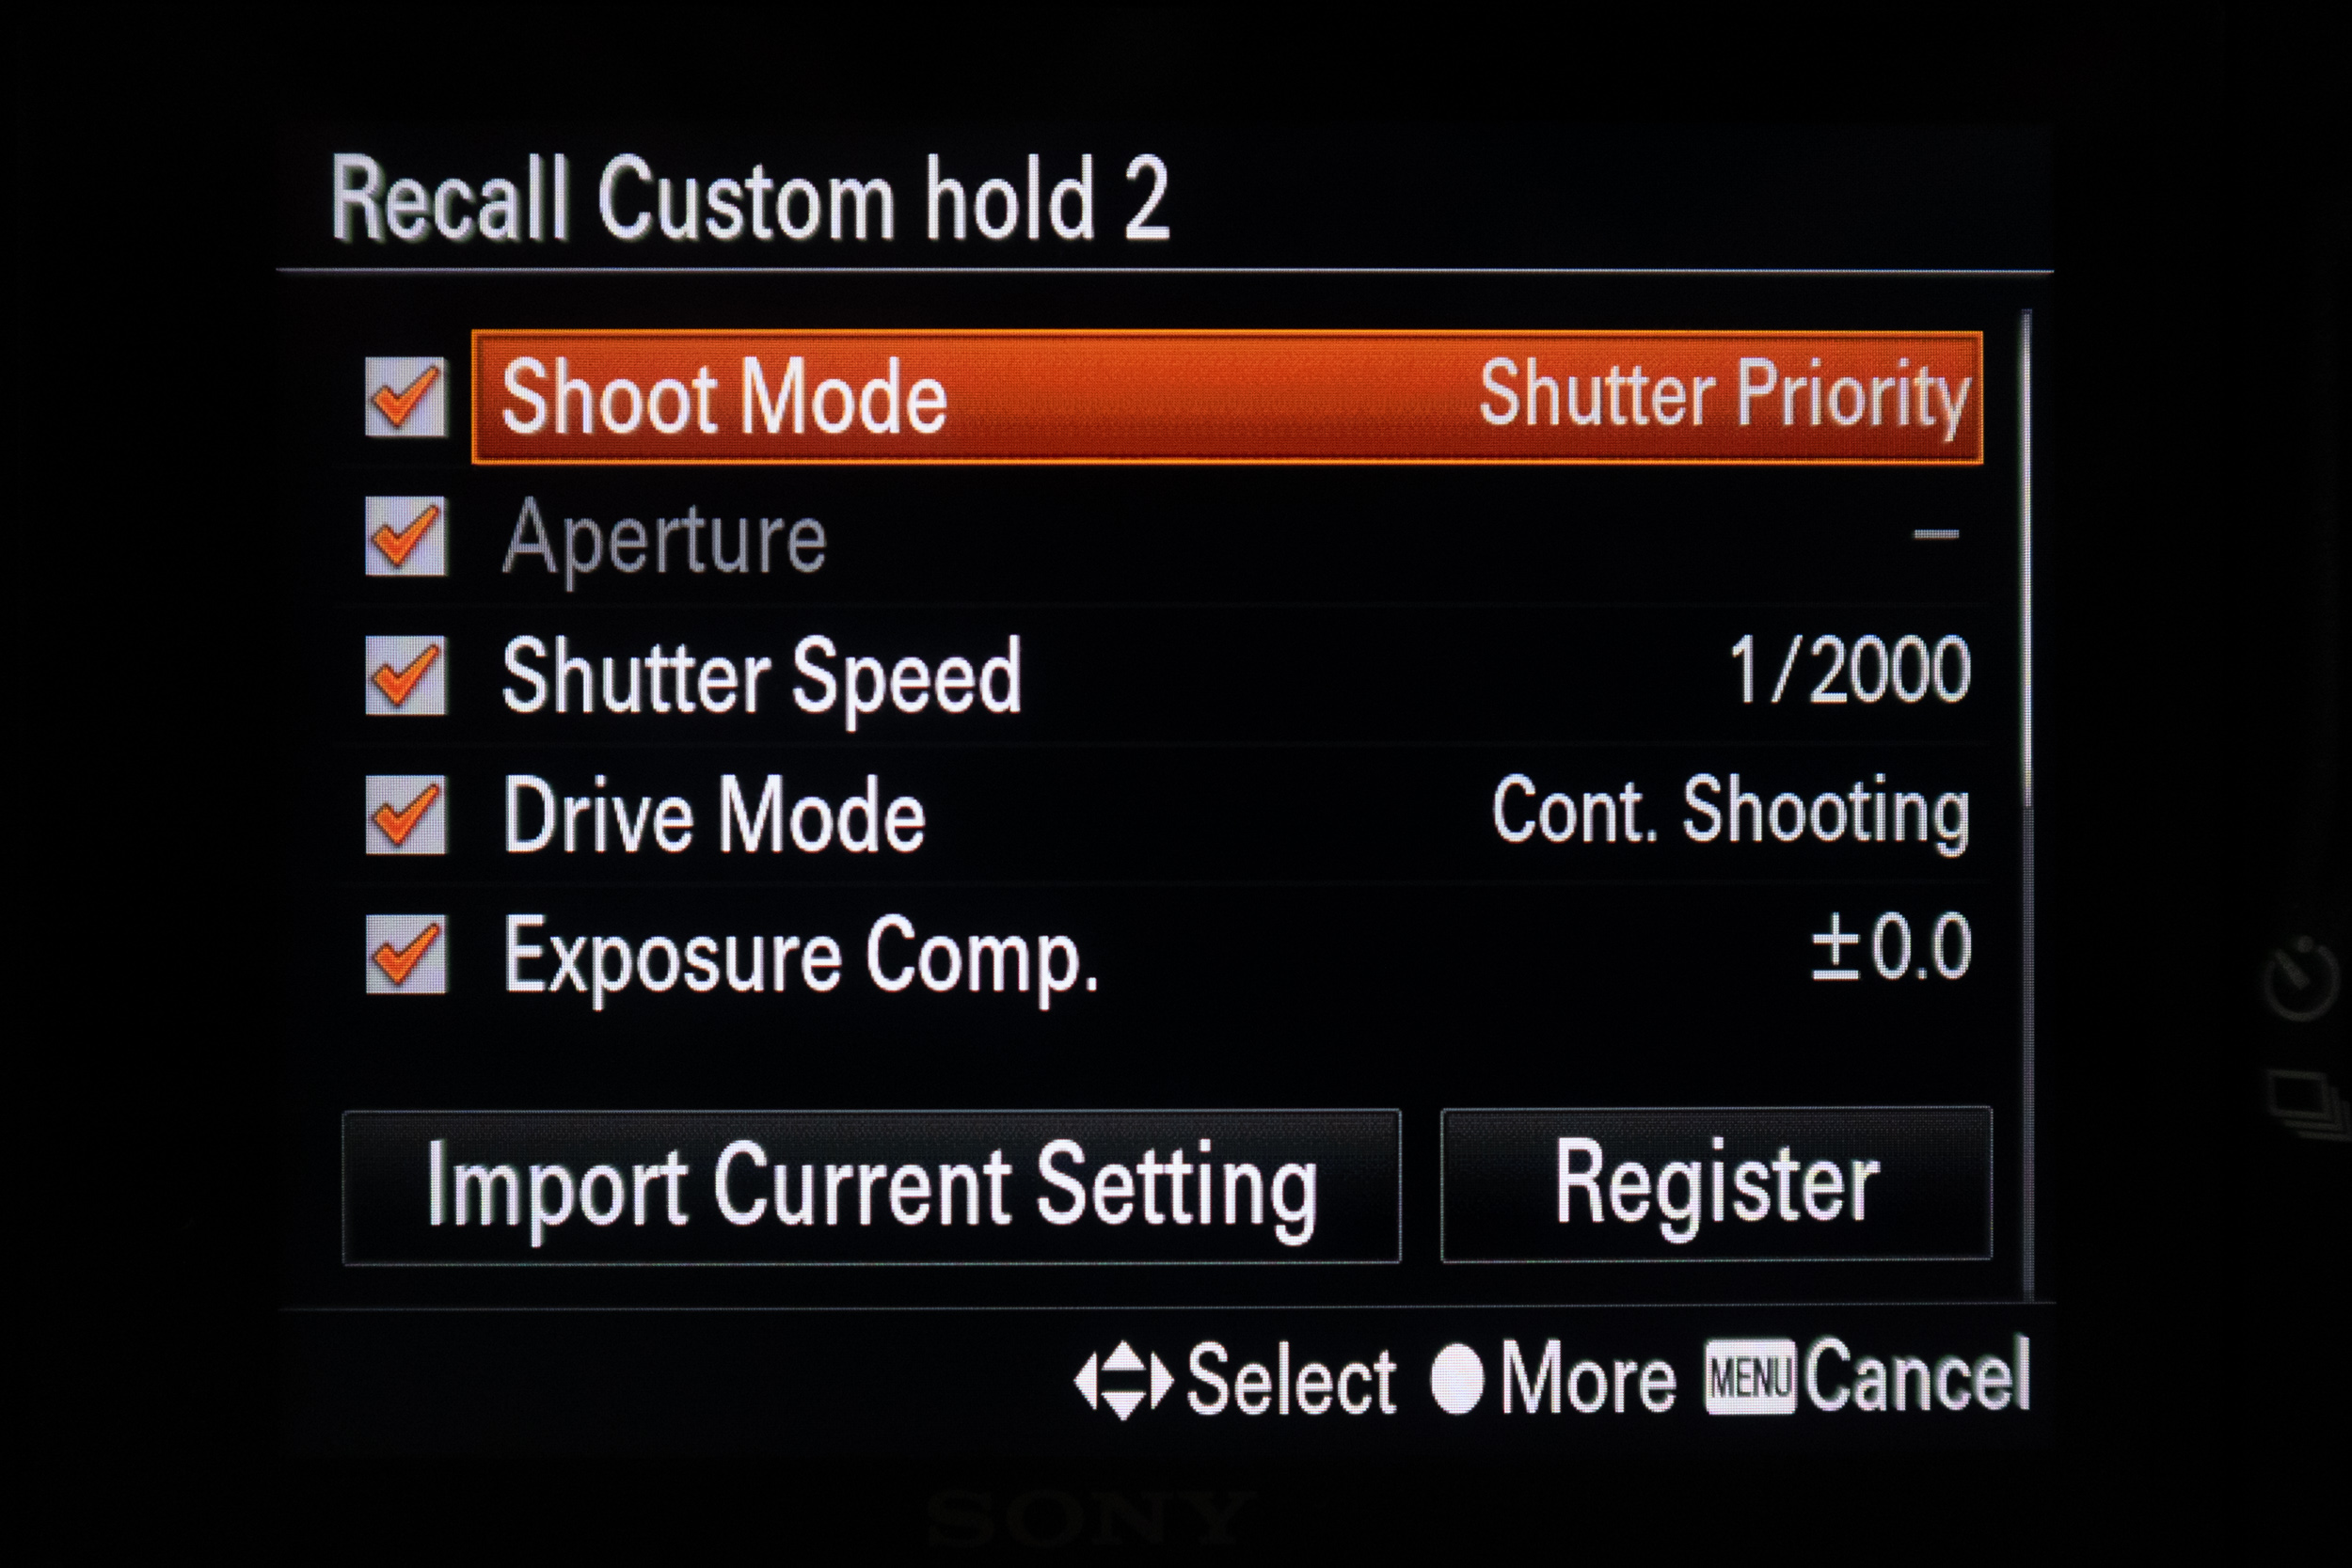
AF-ON Button – Recall Custom hold 2
I have set my Recall Custom hold button 1, 2, 3 for portrait, action and landscape photography (see all my settings below). But I usually have time to change my camera settings for portrait and landscape. The only time I need a single button to recall a specific setting to speed up my workflow is shooting fast moving subject. So I only set one custom button for the recall function and it’s for action only.


My Biggest Learning About Custom Buttons
Using custom buttons allows you to quickly access and change certain settings. It’s supposed to speed up your work flow.
I used to assign every possible custom button something, expecting a faster workflow. The result was the opposite. Some custom buttons I assigned to were related to landscape photography, while I mostly used the camera for portrait this past year. I found myself struggling to remember all the custom buttons, and sometimes mistakenly adjusted settings by accidentally clicking on custom buttons. Sometimes, certain settings do not work unless you make other adjustment. It could cause lots of confusion.
After many trials and errors, I have decided to leave some custom buttons unassigned. With fewer buttons, my camera operation becomes much smoother.
Additional Features You Might Like
Last but not least, I’d like to talk about a few more features I find useful, particularly if you use the camera for different purposes (eg. for landscape photography).
Zebra level
With this function on, you can easily see if and which part of your image is over-exposed. I find it very useful and leave it on the whole time. So there’s no need to assign a custom button for it. And I moved it to my quick menu just in case I need to turn it off.
Peak Display
Only work for manual focus. With peak display on, the camera will highlight the parts of the image that is in focus, in a color of your choice.
Since I use eye autofocus most time to photograph people this past year, I didn’t need to use or change this setting regularly.
Peak color
Only work for manual focus. Usually in conjunction with peak display, you can choose red, yellow or white to highlight the part of your image in focus. I set red. This is possibly a one time change.
AF/MF Control toggle
Quick switch between auto focus and manual focus, which could be useful in landscape photography or video. I found this causing me more trouble when I had this assigned to a custom button. Sometimes I accidentally clicked the custom button and did not realize the camera was in manual focus mode. Then when it was time to capture quick-moving action, I lost the shots.
Changing between auto focus and manual focus is actually quite easy in focus mode, which already has a dedicated custom button. So there is no need to assign an extra custom button for this.

Interval shooting
For time lapse. I haven’t had much chance to do landscape photography on this camera, so no need to change it often.
Touch operation selection
There are times I just don’t want to change the settings, especially focus settings, by accidentally touching the screen. I can turn the touch operation off. But it’s not something I have to change often.
Finder/Monitor selection
At the very beginning I was perplexed why the monitor turned off automatically. I then realized if I put my hand behind the viewfinder the monitor automatically turned off. Now, as long as I’m careful and don’t cover the viewfinder, it wouldn't trigger this monitor auto shutoff. So there’s no need to change.
Since none of the above requires frequent change, I put them either in the quick menu or my menu.
In summary, you have to use the camera for an extended period of time to get a solid understanding of your essential needs. For different genre and types of photography works, you should consider assigning your custom buttons accordingly to enhance your workflow.
I hope this post helps you shorten your learning curve if you are new to Sony mirrorless cameras. Feel free to comment what you photograph most and what your top custom settings are.
you may also love…


Owning a full-frame mirrorless doesn’t always mean you’ll document more life. In this article, I explain why I now carry Insta360 Ace Pro 2’s Xplorer Grip Pro Bundle, a compact camera system, alongside my main mirrorless setup — and how lightweight design, straight-out-of-camera video, and ease of use changed my creative workflow.